BUILD YOUR OWN RAKU KILN
THIS TYPE OF KILN IS DANGEROUS TO OPERATE:
If you decide to follow these plans you do so at your own risk! Fire only outdoors in well-ventilated areas as galvanized zinc coating on this type of trashcan can be harmful if vaporized.

I actually started out my ceramics career with a dislike for low-fire wares. I mean, if it’s not functional, what good is it, right? I then had the amazing pleasure to experience my first raku firing workshop and it changed the way I felt about ceramics forever. I was very successful with my first raku firings and I quickly learned that it was much easier for me to obtain the wonderful colors and crazing that I loved so much in other people’s pottery using the raku technique. While it’s true raku vessels are inappropriate for long-term storage of liquids, they are generally fine for a multitude of dry goods. After all, a terracotta flowerpot can be submerged in water for a long period of time with no ill effects. However, if you plug the hole and fill the flowerpot with liquid so it can hold your favorite flowers, the water will eventually begin to seep out of the clay body. The actual piece of ceramic is unaffected by this, (unless you let it freeze). Why am I spending so much time talking about what Raku can’t be used for? I just don’t want you to get it into your head that you can start making oil lamps and wine bottles out of raku. It just shouldn’t be done. Raku is a wonderful, semi-functional art form but vitrified stoneware it is not!

Once you have your fiber blanket you’ll need a propane source, (the 20lb bottle from your barbecue grill will work just fine). If you have access to a larger reservoir of gas (40lb or even a 100lb tank) that would be even better because you won’t have to switch out the smaller tanks as often (which is a pain) especially in the middle of a firing. Now that you have the parts to construct the kiln and the fuel to power it, you’ll need a way to get the fire into the kiln.

A ‘regulator’ is simply a device that allows only a certain amount of gas out of the propane bottle at a time. You can opt for a high-end model with an adjustable gauge or just use one of the little fixed ones that come with most barbeque grills. YOU MUST USE ONE OF THESE.

I then purchased a ‘Ward MR750′ venturi burner. I got mine at my local ceramic distributor, but they are also available on the web at (www.wardburner.com). This only cost me thirty-five dollars at the time (they are now $80) and made a world of difference. These burners have a way for you to adjust the amount of oxygen going into the kiln so you can keep the atmosphere inside the kiln stable. Try looking on eBay or asking your local ceramics distributor.

First off, put your trash can upside down and cut a hole about 4.5-5” in diameter right in the middle. You’ll probably need a drill and a pair of tin snips to get this done. Next, do the same thing for the port on the side. Make sure the hole for the burner is about 1.5 – 2” above the bottom rolled edge (top) of the trashcan so you’ll have space to keep some fiber blanket under the hole and make sure the side hole is about one inch larger around than the width of the burner venturi/weed burner you plan to use. If you are having a hard time making it nice and round, just cut the hole square. It really doesn’t matter about the shape. The lip at the bottom of the trashcan (your new kilns TOP) is great for drilling into and adding handles so you can lift the kiln off of your pieces. I used two large ‘U-bolts’ to attach as handles . (this is an absolute must, by the way!).

After you’ve made a big circle from drilling multiple close-fit holes, you can get a pair of tin snips and cut out your flue. Leave the ‘teeth’ along the edge of the hole after you use the tin snips, then bend them inward with a pair of pliers to help hold the fiber blanket in place – more on this later. Your trashcan is now ready to be lined with fiber blanket – you could drill the holes for ceramic buttons and high temperatue wire at this point if you wish – (more on this later).

You’ll need to use the top of your Trashcan as a template to trace around the fiber blanket and make a circle to place inside the kiln. This will be for its ceiling (placed on the BOTTOM of your trashcan). If you only have half inch fiber blanket, this ceiling will have to stay in place by using ceramic buttons to hold it up.

Make yourself about 25 -30 little disks out of high-fire clay, all about 1.5 inches in diameter and bisque fire them. Place an ‘Ear’ or tab behind the disk and put a hole through it. This way when you pass the ‘High Temperature Wire’ through the tab and use it to attach the CFB to the inside of your kiln, it won’t be directly exposed to the flames (See Photos). You might want to fire a few extra just in case.

You’ll have to punch holes in the side of the trash can wherever you are going to place a button and tie the wire in a way that the button pulls the blanket to the inner wall of the kiln. Make sure none of the original surface of the trash can will be seen on the inside of the kiln. You’re almost done.


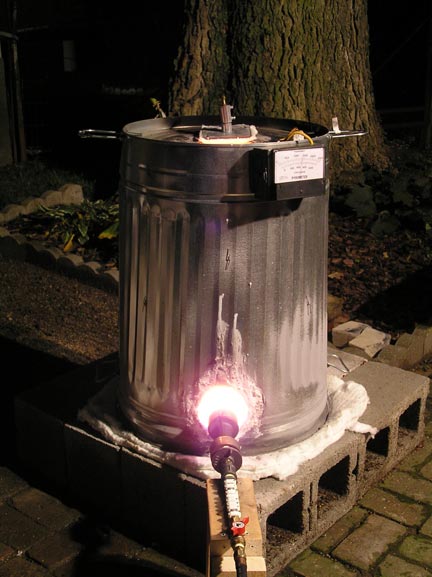
In these pictures, I’ve added a few extras like handles on the top of the kiln, (you’ll need those if you want to lift the thing off your pottery). I had an old pyrometer lying around, so I went ahead and attached that too. The snowy white substance around the bottom hole is Sodium Silicate to help hold the fiber blanket to the edge of the hole. I later found that this wasn’t necessary at all and a big mess.
If you ended up like me, you’ll have about ¼” or so of the bottom of the inside of your kiln that didn’t quite get covered by the fiber blanket. What I do is place 2 layers of the CFB down on my base and put the kiln down on that. The pillowing action of the trashcan rim against the layers of blanket seal the kiln nicely. You can see the 2 layers of fire blanket on top of the concrete blocks (you only need one if you’re using 1-inch blanket). This is important to seal the bottom of the kiln and to prevent the concrete blocks from shattering due to the intense heat.


Constructing your own raku kiln certainly isn’t rocket science, but there are several rules you need to follow to remain safe and have a good firing experience. There are also many good sources on the Internet aside from mine for constructing this type of kiln so you might also give those a try. Some of them are free, others are not, but all basically tell the same story about Ceramic Fiber Blanket – It is hazardous to breath. Please make sure and wear a proper dust mask when constructing this kiln to prevent the fibers from injuring your lungs and eyes. Okay, I’ll get off my soap-box now.


Most raku ceramics fire to around ^06 – ^04 or somewhere around 1800 degrees Fahrenheit. Now I’m getting to the fun part! It’s very easy to manufacture your own raku kiln out of a standard steel trash can or 55gal. oil drum. The secret, my friend, is “Ceramic Fiber Blanket”. There are many brands of this refractory blanket on the market: Fiberfrax® , Kaowool®, Isofrax®, etc. And it can be obtained many places, but I suggest you start your quest by checking out eBay first. Most brands of CFB can withstand extended periods of more than 2000 deg. Fahrenheit. This material, by itself, is basically your kiln, the trashcan is just used to hold the material in place. You can use lots of different supports for the fire blanket. Anything like heavy hardware cloth, fencing or chicken wire that can be molded to shape and can withstand some heat. CFB usually comes in ½” – 2 ” thickness and you need to make sure it’s of 8 pound density. Also it would be good if it was at least 24” wide.


The first thing I used was a ‘weed burner’ that you can obtain from a home improvement store for about twenty-five dollars. This worked okay but it was difficult to adjust the output and I had to modify the port/hole in the burner to get enough gas into the kiln. If you’re just starting out, this arrangement should be fine for your first few firings – but you’ll quickly graduate to something better – trust me.

Now you need to put your kiln together. There are several methods to do this, so let’s look at a few. If you make a kiln that can be lifted off the base entirely, you’ll have a much easier time getting your pieces off the base and into the post-reduction quicker. On the other hand, if you make a top-loading raku kiln you can remove the top without the pieces cooling too quickly – this allows you to take a little time to unload your kiln. Both ideas work well but for the sake of time and money, we’re going to be building the “all-in-one” Top-Hat design kiln that can be lifted from its base completely. I think it’s easier to build and it has fewer overall parts.


Now it’s time to attach your ceramic fiber blanket to the inside of your kiln. If you could only find ½” thick blanket, you’ll have to make ‘Ceramic Buttons’ to get the blanket to stay attached to the can. With ½” blanket you’ll also have to wrap the inside of the can twice which won’t let you use an adhesive very easily. If you were lucky enough to get a hold of 1″ or 2″ fiber blanket, you could conceivably use ‘Sodium Silicate’ or ‘Liquid Glass Solution’ to hold it in place. This method can backfire, however, and you may find yourself doing the ceramic button technique anyway after a few firings.


Now all you have to do is neatly cut the blanket away flush with the large holes you made in the trashcan you can see why we left the pointy teeth on the inside – it doesn’t have to be too pretty, and you’re finished.


Adding a thermocouple to the top of the kiln through a hole drilled into the roof. This will allow for the use of an accurate pyrometer.


Visit our Etsy store if you think you might like to build something that’s a little more permanent.